In my first article in Cosmos DB, I talked about the basic information about How to provision Cosmos DB, and today we will complete our discussion in How Cosmos DB Partitioning work, and What are the Logical Partition and Physical Partition then in the upcoming posts we will talk more and more about Designing and Architecture Layers for Cosmos DB Such as Consistency levels in Cosmos DB Which Consistency levels are suitable with your APP, What are Cosmos API choices, Disaster Recovery and High Availability in Cosmos DB Keep Following ..
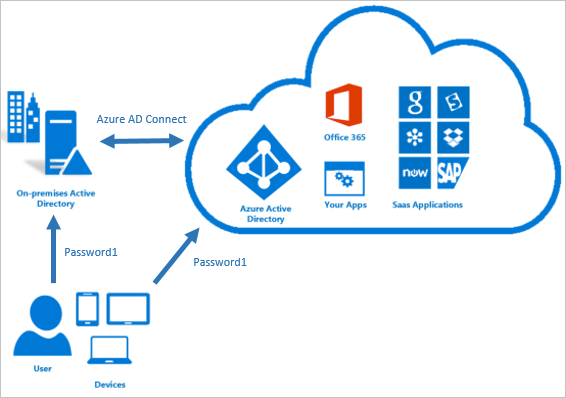
When you are planning for Hyper model and you need to sync the identity between your local active directly on-premises to azure active directory at this time you will need to know what is Azure AD connect
One of the tasks that any DBA now can be asked to upgrade the production environment to the latest SQL Server version . and this task is more critical you can find below some tips and resources that can be helpful on this tasks
How to decide on an
upgrade
SQL Server 2000 and SQL Server 2005 are no longer supported by Microsoft and no updates are published. This lack of support means your databases may be vulnerable to security attacks that have been addressed by recent upgrades. Upgrade these database servers unless you can afford to lose them or allow the data they contain to fall into malicious hands.
Because these databases are no longer supported, it is highly likely that you are not in compliance with the data protection laws in your region.
Your company already uses Azure for other systems and may wish to migrate databases into Azure as well. You cannot migrate a database into Azure SQL Database from SQL Server 2000 or 2005.
You can upgrade a SQL Server 2005 database server to SQL Server 2017 directly. However, to upgrade from SQL Server 2000, you must first upgrade to SQL Server 2008.
Discover your DB and
Document anything (versions, features, editions , DB Size , DB Count ,
Configuration component, ..etc ) you can use (Microsoft Assessment and
Planning (MAP) toolkit) in this part
Data Migration Assistant
(DMA) :
supports versions of SQL Server from 2005 upwards. Using the assistant,
you connect to the instance and select the database you plan to upgrade.
You tell the assistant the target version of SQL Server and it will
analyze the size and schema of the database. It will also make
recommendations for your upgrade. After the analysis, DMA provides a
compatibility report, which highlights breaking changes, behavioral
changes, and deprecated features so these problems can be fixed.
Database Experimentation
Assistant (DEA) : To test your migration and upgrade process to test
the DB performance and workload if we upgraded it You can also test
performance on different hardware or with new features added
SQL
database corruption is the issue every database admin has to face at
some point in their lifetime. But do you know what can cause you more
trouble than a corrupt database? It is the misconceptions around SQL
database corruption. These myths can actually worsen the situation
for SQL database and its users. Therefore, it is crucial that users
have the full knowledge of SQL Database corruptions and the myths and
reality surrounding it.
Some
Common Myths Regarding Database Corruptions
Let’s
explore which ideas about database corruption are basically
misconceptions.
Server Restart/ Reboot is the Quickest Method to Fix Corruption: This is one of the most prevailing misconceptions about SQL database corruption. SQL Server reboot or Windows Server restart will not fix the corruption, rather, it will possibly make the situation worse by putting it in Suspect mode. Detaching a database that is already in Suspect mode will make it impossible to fix the corruption ins future. A corrupt database page requires repairing or restoration, not reattaching.
Detaching and Re-attaching the Database will Resolve Corruption: This is another malpractice performed by many database admins. Instead of repairing, it will make the database recovery more difficult.
Repetitive Running of DBCC CHECKDB will Do Away With All Corruptions: In some extremely rare cases, re-running the DBCC command may repair one or two minor level corruption from SQL database. But this is not a recommended solution as the chance of success is very rare.
Applying Repair Command is harmless: If you believe that running commands to repair will not cause any harm to your database, you are wrong. If you are running DBCC CHECKDB REPAIR_ALLOW_DATA_LOSS, it is possible that your database may face some significant amount of data loss. So, always keep a backup of your database to avoid this sort of situation.
To Execute Repair Commands, DBCC CHECKDB is Not Required: No, DBCC CHECKDB commands are used for the purpose of checking physical and logical integrity complete set of objects of any particular database. Before and after running the database repairing command, users have to run DBCC CHECKDB. It is not possible to repair database using manual command without running DBCC CHECKDB.
Running Repair Command Alone Assures Corruption Removal: Wrong! The success of Repair command in order to corruption removal depends on many factors. For this reason, its result will vary depending on the severity of the damages done to the database. So, it is mandatory to run DBCC CHECKDB command after repairing. It will help users to find out more critical corruptions and confirm the success of Repair command.
Incomplete Lengthy Operations Lead to Corruption: Many of us believe that if an operation is going on for a long period of time, interrupting it halfway will cause damage to the database. This is not true at all. Database corruption occurs only when there is a physical level corruption (e.g. bug, virus) in the Server.
DBCC CHECKDB is All-In-One Solution for All Corruptions: This is not quite the scene. The Repairing command of DBCC CHECKDB has only the limited capability when it comes to fixing corruption from SQL database. There are many corruptions that repair command is unable to fix, like PFS Page header corruption, Metadata corruption, Common value corruption, etc. If used in case of these corruptions, it will end up extract data in a lengthy process with no result. Moreover, REPAIR_ALLOW_DATA_LOSS command often leads to data loss. Restoration from last good backup is the most useful method in such cases.
Conclusion
There are numerous misconceptions around SQL database corruption in the industry. Here, we have focused on some of the most common myths regarding database corruption in SQL Server. We expect that the users will gain knowledge from this post and be able to take the right decision once the database becomes corrupt. SQL Server experts recommend having a regular backup of the entire database to avoid inconvenience during database corruption. In case any corruption persists in the database, then one can use SysTools MDF Recovery tool to repair corrupted MDF/NDF File of SQL version 2017, 2016 & all below versions.
If you are an SQL user, you must back up your SQL database to save your business-critical data from getting lost/ deleted permanently. Only regular data backup can safeguard your data from various mishaps like end-user error, hardware issues, etc. Just by knowing the importance of backup is not suffice: users need to know the procedure in detail. This post will tell you some of the trusted methods to backup and restore database in SQL Server.
How to Backup and Restore Database in SQL Server
We will be providing you with a step-by-step guide to both the
processes: SQL database backup and restore. Read the following
segments to know more about it.
How to Backup SQL Database
Using this method of SQL Server Management Studio (SSMS), users can
back up the database that can be used at any crucial moment.
a. Open SSMS and go to Object Explorer. Select the Servername and expand it.
b. Expand Databases to choose a user database. Or you can expand System Databases to choose any system database.
c. Right-click and hover your cursor on Tasks>> click
Back up to get the Back Up Database dialog
box.
d. Confirm the name of the database from the drop-down list of
Database. If you want, choose another database from the list.
e. Choose Full from
the drop-down list of Backup
type. (You can also choose SIMPLE or
BULK_LOGGED)
f. To create the
copy-only backup, select the checkbox beside the same option.
g. Select the radio
button beside Database under Backup component.
h. Under Destination
section, choose your destination for backup from the Back up
to drop-down list. Click Add to include
extra backup objects and/or their destinations. You can also remove a
mistakenly added backup destination by selecting it and clicking on
Remove.
Note: To
back up a transaction log, run this script. In this example,l get
created in AllSalesWorks_FullRM_log1.
How to Restore SQL Server Database from
Backup File
If the SQL database encounters some issues that cannot be resolved,
the last good backup of the database can be restored to fix the
problem. In this section, we will describe the process to restore SQL
database from the backup file.
For Full Database Restoration
a. To execute this process, start SQL Server Management Studio
(SSMS), select the option Databases.
b. Right-click on it and choose Restore Database to open a window.
c. Click on the radio button select From Device under Source
for restore section and then click on the Browse icon.
d. Specify Backup window will open. Click on Add and go to the
location where the flat files are stored. Select the first backup
file from the list as it is the Full backup file.
e. Click on OK. The file will get added to the Specify Backup window.
Click on OK again.
f. Choose the target database where you want to restore the backup
file by going to the section “Destination for restore.” Under
“Select the backup sets to restore” section, check mark the
database file chosen earlier.
g. Select Options from the left pane and then do these steps:
Check the box beside Overwrite the existing database (WITH
REPLACE) under ‘Restore potions’ section.
Under ‘Recovery state’ section, choose Leave the database
non-operational, and do not roll back uncommited transactions.
Additional transaction logs can be restored. (RESTORE WITH
NORECOVERY)” radio button.
h. Click OK and the restoration will be done.
I. Perform these steps for every incremental backup file, which
includes the .tm file. When you reach a point when you have to
restore the point-in-time file, follow this second method after
“Restoring” message appears.
For Point-in-Time File Restoration
These steps need to be performed for the restoration of last
incremental file that contains the point-in-time:
a. Start SQL Server Management Studio to right-click on Databases>>
click Restore Database.
b. Choose From Device option under Source for restore section
and click Browse.
c. On the next window, click on Add to go to the location of
the incremental backup file with the point-in-time that you want to
restore. Select that file and click OK.
d. Click on OK again. Select the added backup file in Select
the backup sets to restore segment.
e. Choose the destination database in Destination for restore
section. Click on Browse button next to “To a point in time”
to make ‘Point in time restore’ window appear.
f. Enable ‘a specific date and time’ option and select the date
and time.
g. Click on OK>> Options (left panel)>>
Overwrite the existing database>> Leave the database
ready to use by rolling back uncommitted transactions. Additional
transaction logs can be restored. (RESTORE WITH RECOVERY)
h. Click OK to perform the process. In the restored database,
you will only view the changes done to a particular point-in-time.
SQL Backup Recovery: The Ultimate Way to Restore Healthy and
Corrupt BAK File
As we can see, the manual restoration process is a long one. Moreover, this process does not support restoring data from corrupt BAK file. To avoid these problems, SQL bak File Repair is a reliable solution. In some easy steps, users can restore their corrupt or healthy .bak file to SQL database.
a. Launch the tool and Add BAK file.
b. The software will resolve all the issues and offer full Preview. Click on Export.
c. You can export as SQL Server Database or as .csv script.
Concluding Words
In case you are wondering about the process to backup and restore SQL database, here are some of the approaches you can follow. All the methods mentioned here have been tested and users can execute them without any worry. If your backup file is damaged or you prefer an easy way of restoration, you must go for SQL Backup Recovery Tool.