Introduction
Azure Recovery service vault It is azure built in services doesn’t required any infrastructure preparation and it is supported multiple types of backup (VM , File , Disk and SQL Database) it is one of the built options in the VM , so easily when you open Azure virtual machines and select your VM you will find in the left side Backup from this point and this place you can start to manage your backup and restore process as well you can keep monitoring your backup jobs and restore jobs let us go for demo and how to do VM backup and restore it and what is the restore types supported.
- Azure backup Process.
- Azure backup hints
- How to start to take backup from VM
- Azure Recovery Services vault
- Azure Restore Options
- Azure Restore Hints
- How to do VM restore from Azure recovery services vault
To know more information about azure services check my (Latest Microsoft Azure Articles and Posts)
Azure backup Process:
How the backup process will start and what is the sequences that running behind the seances when I asked azure backup services to take backup from my MV.
- You need to install Azure backup recovery vault Services
- Define backup policy then the backup extension will be installed.
- After this the backup services will start to discovery and analysis your VM disks, files, data and size.
- Then It will start to create Snapshot from your data. That’s why the backup process sometimes take time but this time will not be more than 24 Hours.
- After the snapshot completed the Azure backup extension will transfer the snapshot to azure backup recovery vault.
Azure backup hints
- One backup per day is the maximum
- To handle the backup, you will need to install backup extension and it is supported Windows and Linux. And it will be created automatically while creating azure vault service
- During the process of moving the snapshot to azure backup vault you should not wait the move process to do your restore no you can do fast restore from the snapshot that is saved locally and by default the snapshot saved the local storage “Account storage” for two days and you can edit this number but this meaning more size on your storage “This configuration can be done from backup policy”
- After this the backup snapshot by default will be available on Azure backup vault for 180 days for daily backup and 12 weeks for weekly backup and you have also retention period for monthly and yearly “This configuration can be done from backup policy”
- By default, recovery vault is Geo- redundant Storage (GRS) meaning one vault in your region and other vault in another region and you can change this configuration for example you can do it LRS (Local redundant Storage).
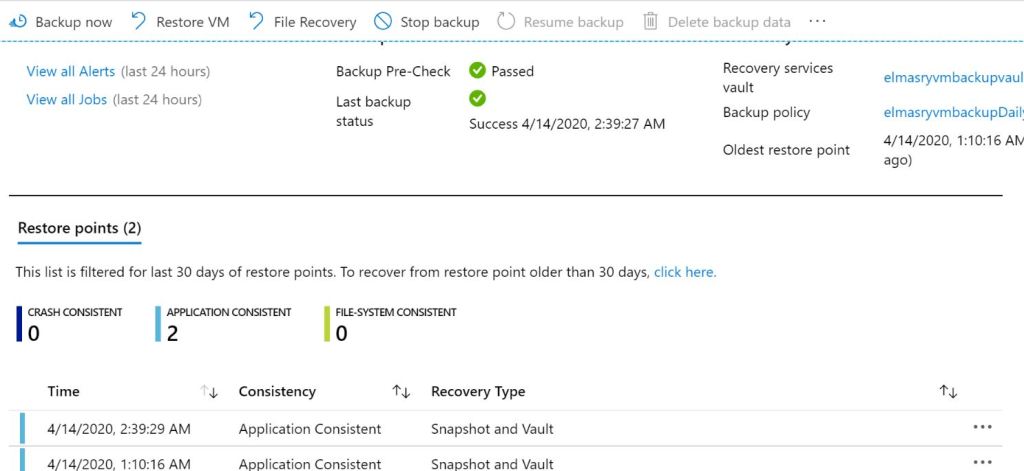
- Azure Backup Vault Services on Windows VM working with (VSS) Services Windows Volume Shadow copy Service to take an app-consistent snapshot of the VM. And once your backup done you will find in azure backup page (APPLICATION CONSISTENT) as information.
- Azure Backup Vault Services on Linux VM working with takes a file-consistent backup and if you need to implement (VSS) Volume Shadow copy Service you need to di it manual with custom script
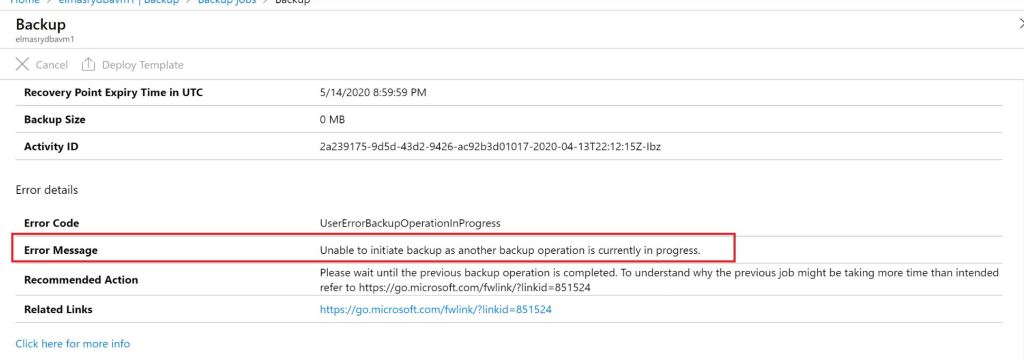
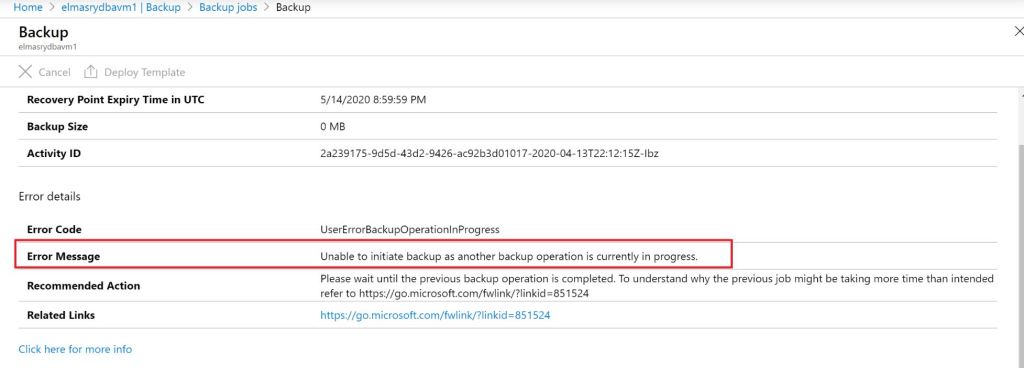
- You cannot run more than one backup job for the same VM on the same time.” Failed”
How to start to take backup from VM
- Open Microsoft azure portal >> in the search write Virtual machines >> Select your VM >> in the left side click on Backup
- IF you already have services recovery vault crated you can select it or you can create new one
- To create new Vault, you need (Name, Resource Group, Policy) and you can create new resource group and new policy from the same page.
- Backup Policy it can be (Daily , Weekly , monthly , yearly) each option you can configure the retention period for it and the (Retain instant recovery snapshot(s)) How many days you need to keep your snapshot in your storage to do fast restore from it (More days = More Storage)
- Now your backup enables and you ready to take your first backup
- Backup Jobs you can track your job progress and restore also from it and you can find it when you select VM > Backup > in the left side you will find backup job or you can find it on the recovery service vault
Azure Recovery Services vault
- You can open it by doing search on the portal by “Recovery Services vault” or from VM Select backup from the left side and on the top right you will find your “Recovery services vault” name if you click on the name it will direct you to the services.
- From Recovery services vault you can know backup in Progress or failed , what is the services covered by this vault like How many VM’s , you can know the type of your backup storage is it LRS (Local redundant Storage) or GRS (Geo- redundant Storage)
- In the left side you can find Backup Jobs from it you can know all of the backup jobs executed, if you click on failed job you will know the why it is failed for example “Unable to initiate backup as another backup operation is currently in progress


Azure Restore Options
- Restore Backup of the VM as new VM
- Restore backup of the VM as replace current VM
- Restore Disk from the backup
- Restore file by browsing the snapshot and selected which files you need to restore it
Azure Restore Hints
- If you restored a VM to the same resource group with the same name as the originally backed-up VM, backup continues on the VM after restore.
- If you restored the VM to a different resource group or you specified a different name for the restored VM, you need to set up backup for the restored VM
- IF the VM used Static IP and you do restore for the VM it will be converted to Dynamic IP at this time you should change the configure of the IP again.
How to do VM restore from Azure recovery services vault
- Open VM > backup option > in the end of the page you will find list by backups with recovery types (Snapshot: Meaning the Snapshot taken but still not transferred to Vault, Snapshot and Vault: Meaning the Snapshot taken and transferred to vault
- Select the backup you need it and right click on it and select from restore VM or file recovery
- If you Selected Restore VM you will have two option replace current one or create new one
- IF you selected the File recovery Azure will generate PowerShell script it will be download as EXE for Example “IaaSVMILRExeForWindows.exe” Run it as administrator and the script will mount all of the disks on your machine to recovery your files , to unmount the disks on the same page you can click on Unmount Disks. Just only.

One thought on “Virtual Machine (VM) Backup and Restore (Vault)”