We talked before about Storage and the types of storage and how to manage the storage but today we will talk about the file share that’s one of the types of azure storage and the questions now after creating the file share how I can sync my files from my V-Center VM to Azure File share, Microsoft provided us services called Azure file sync so to let us know how we can configure it and what is the prerequisites we should configure it on the V-Center VM
For more information about Azure Storage check below posts and if you need to check all of my azure posts ➡ Latest Microsoft Azure Articles and Posts
Managing and implementing Azure storage
Microsoft Azure Storage Kind and Architecture
Create Storage Account Using PowerShell and CLI Command
How To Monitor Azure Storage Account
- Create Azure File Share.
- Files Assessment on local V-Center VM.
- Install Azure File Sync on Azure.
- Install Azure File Sync on local V-Center VM
- Registration Verification
- Create Cloud Sync endpoint and server endpoint
Create Azure File Share
- Create Resource Group if you don’t have you can do it from the portal or by PowerShell and CLI
---PowerShell
New-AzResourceGroup -Name storageresourcegroup -location "East US 2"
---CLI
az group create --name storageresourcegroup2 --location "East US 2"
- Create Storage account and you can do it using (Azure Portal, PowerShell or CLI)
---PowerShell
New-AzStorageAccount -name elmasryteststorage1 -ResourceGroupName storageresourcegroup -SkuName Standard_LRS -location "East US 2" -kind Storagev2
---CLI
az storage account create --name elmasryteststorage2 --resource-group storageresourcegroup2 --location "East US 2" --kind storagev2 --sku standard_LRS
For more information about How to Manage Storage account check this post Create Storage Account Using PowerShell and CLI Command
- Create File Share using Portal it will need only name and Quota and for your note the maximum quota it 5 TB once you created the storage account click on it and you find the 4 types of the storage click on a File share and write the name and the quota.
Files Assessment on local V-Center VM
Now we need to assess the files that we need to sync it with azure file share and this we will do it using PowerShell scripting command
Install-Module -Name packagemanagement -Repository PSGallery -Force
Install-Module -Name PowerShellGet -Repository PSGallery -Force
Install-Module -Name Az.StorageSync -AllowPrerelease -AllowClobber -force
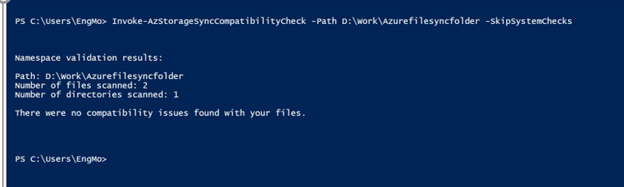
Invoke-AzStorageSyncCompatibilityCheck -Path D:\Work\Azurefilesyncfolder
Maybe you can find an issue on the last command and if it shows to you error like below image you can add (-SkipSystemChecks) to the command and It will work fine
Invoke-AzStorageSyncCompatibilityCheck -Path D:\Work\Azurefilesyncfolder -SkipSystemChecks
After Executing the command with (-SkipSystemChecks) or without the results should be something like this
Install Azure File Sync on Azure
Now we need to install Azure File Sync on Azure portal and you can do Search on Azure Portal services by the name “Deploy Azure File Sync” or click on this link it will direct you to the correct page that you can create from it Azure file sync in this page we need below information.
- Resource Group name we created it
- Name for Storage sync Services
- Regain

Install Azure File Sync on local V-Center VM
To be able to sync the data from your local VM to azure we have some steps we need to do it on local VM to registered this VM with Storage sync Services we created it on Azure in the last step.
- Turn off IE Enhanced Security Configuration from server Manger
- Install the latest AzureRM module as it is required by the Azure file sync agent and this step you can do it by below PowerShell Code and I highly recommend you to look at this post (How to manage Azure using Windows PowerShell) you learn how to add most of the used azure modules on your PowerShell.
Install-Module -Name AzureRM -AllowClobber
- Install agent “Azure File Sync Agent” you can download it from here, after installation you should
- Now after installation, it is time to sign in to Azure using Azure file sync agent to register your VM With Azure Storage sync services. Once you click on the sign-in, it will open for you a dialog box to add your Azure account and Password and this the reason for disabling the IE Enhanced Security Configuration to be able to see the dialog box
Registration Verification
Now we need to check if our VM registered with Storage sync Services on Azure to do this.
- Open Azure Storage Sync Services we created it on azure if you open your Azure resource group, we created it in the first step you will find this service under it
- Click on it then on the left side you will find Registered servers if you click on it you will find your local VM information
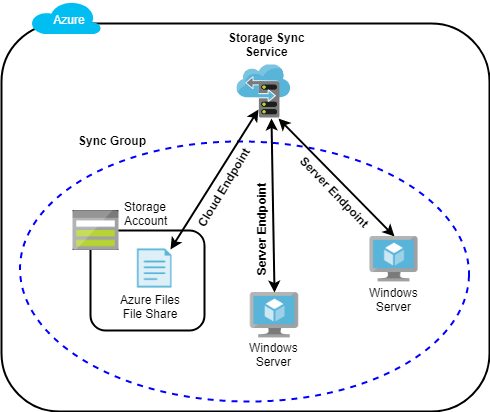
Create Cloud Sync endpoint and server endpoint
- Open Azure Storage Sync Services we created it on azure if you open your Azure resource group, we created it in the first step you will find this service under it
- Click on it and from the top select (Sync Group) and it will be required from you (Name, Storage account we created it, Azure File Share we created it under the storage account)
- Now we created the endpoint and we need to create the server endpoint
- Click on the Azure Sync group we created it in the top, select server endpoint to create it.
- To create Server endpoint, we will need to select the registered servers that we installed on it the Azure Sync file Agent and we validated it in the registered servers in Storage Sync Services.
- Also, we need to add the path we need to sync the data from the local VM. Example D:\Work\Azurefilesyncfolder
After creating the Server endpoint azure file sync services will start to sync your local files to an Azure file share to check it open the storage account then file share and you will find all of your files.

One thought on “Sync your local files with Azure Storage Sync Service”